Settings Configuration
The Settings tab is the foundation of your WiCAN Pro. It is divided into five sub-tabs that control how the device connects to networks, pairs with Bluetooth, reads the vehicle's bus, and transmits telemetry.
Always remember to click the Submit Changes button at the bottom of the sidebar to save any modifications made on these tabs.
1. AP Config (Access Point)
This tab controls how the WiCAN Pro broadcasts its own Wi-Fi network and manages its operating modes.
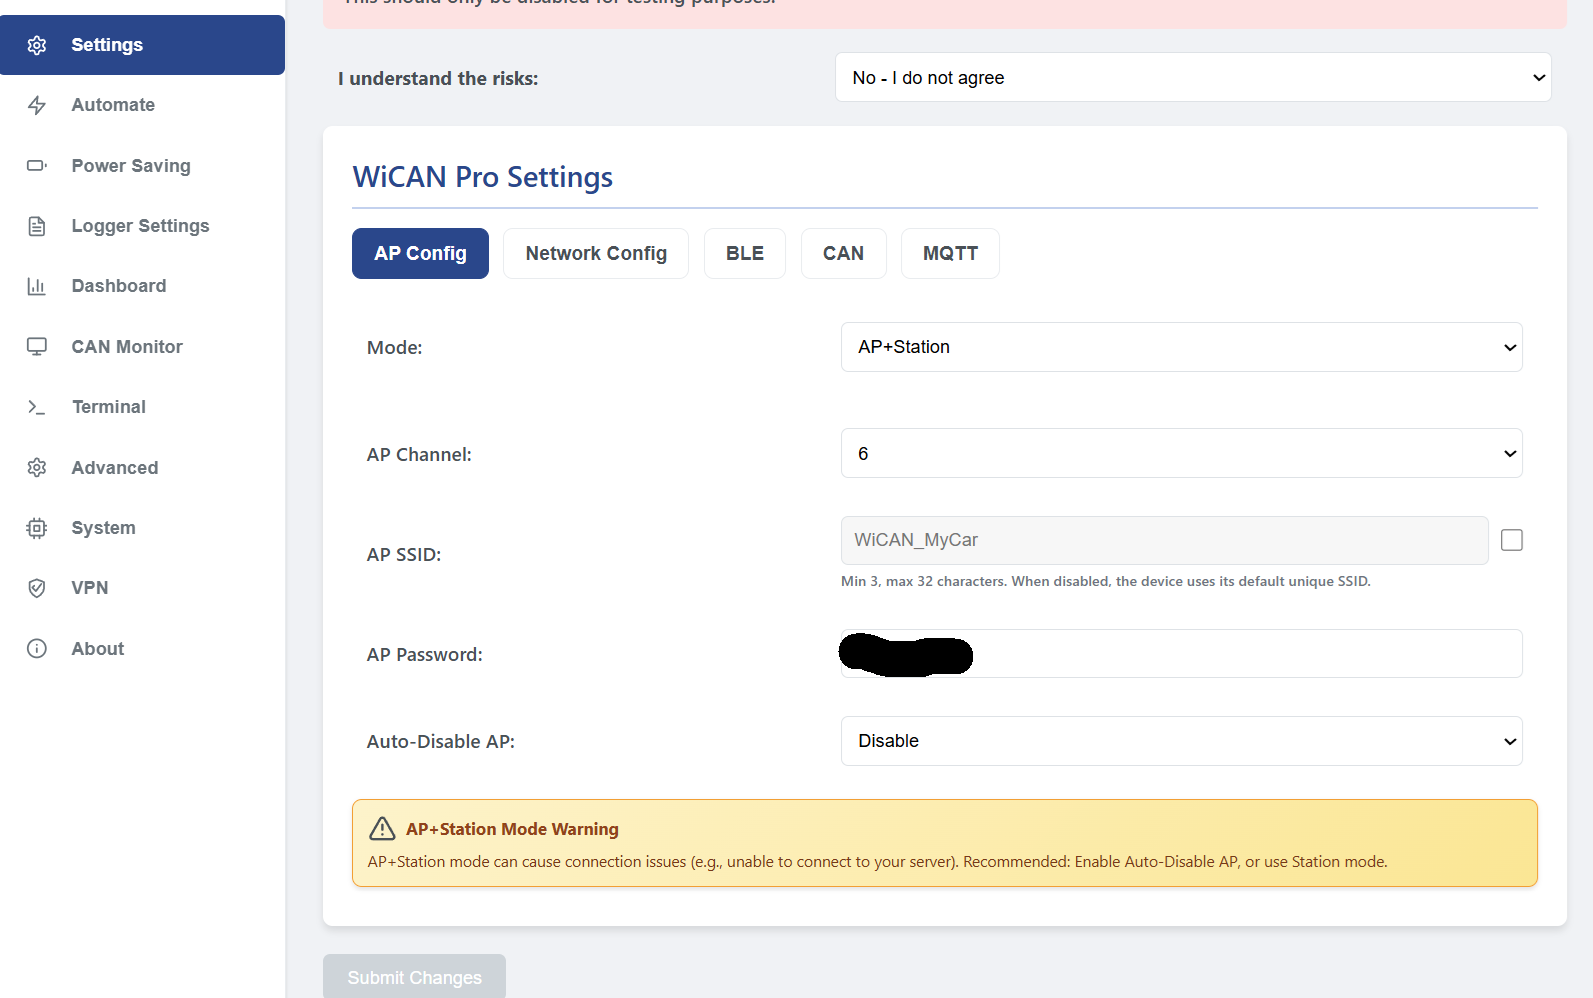
Important Note on AP Modes: Whenever a mode that includes "AP" is active (like AP Mode or AP+Station), the WiCAN Pro will broadcast its own network and can always be directly accessed at http://192.168.0.10. This is highly useful as a direct fallback method to access the device if your main home network goes down, or if a configuration/update fails.
- Mode: The primary operating state of the device.
- AP Mode: Broadcasts its own network. You must connect directly to it.
- Station Mode: Connects to an existing router (like your home Wi-Fi). The AP turns off.
- AP+Station: Does both simultaneously. (Note: This can sometimes cause routing conflicts; Auto-Disable AP is recommended if using this).
- BLE+Station: Uses Bluetooth for local app connections while maintaining a Wi-Fi connection to your router.
- AP Channel: Select the Wi-Fi channel (1-14) to avoid interference with other local networks.
- AP SSID & Password: The name and password of the WiCAN's broadcasted network. You must change the default password (
@meatpi#) for security. - Auto-Disable AP: If enabled in AP+Station mode, the WiCAN will shut off its Access Point once it successfully connects to your home network, reducing power draw and wireless interference.
2. Network Config (Station Mode)
This tab is used to connect the WiCAN Pro to your existing local networks.
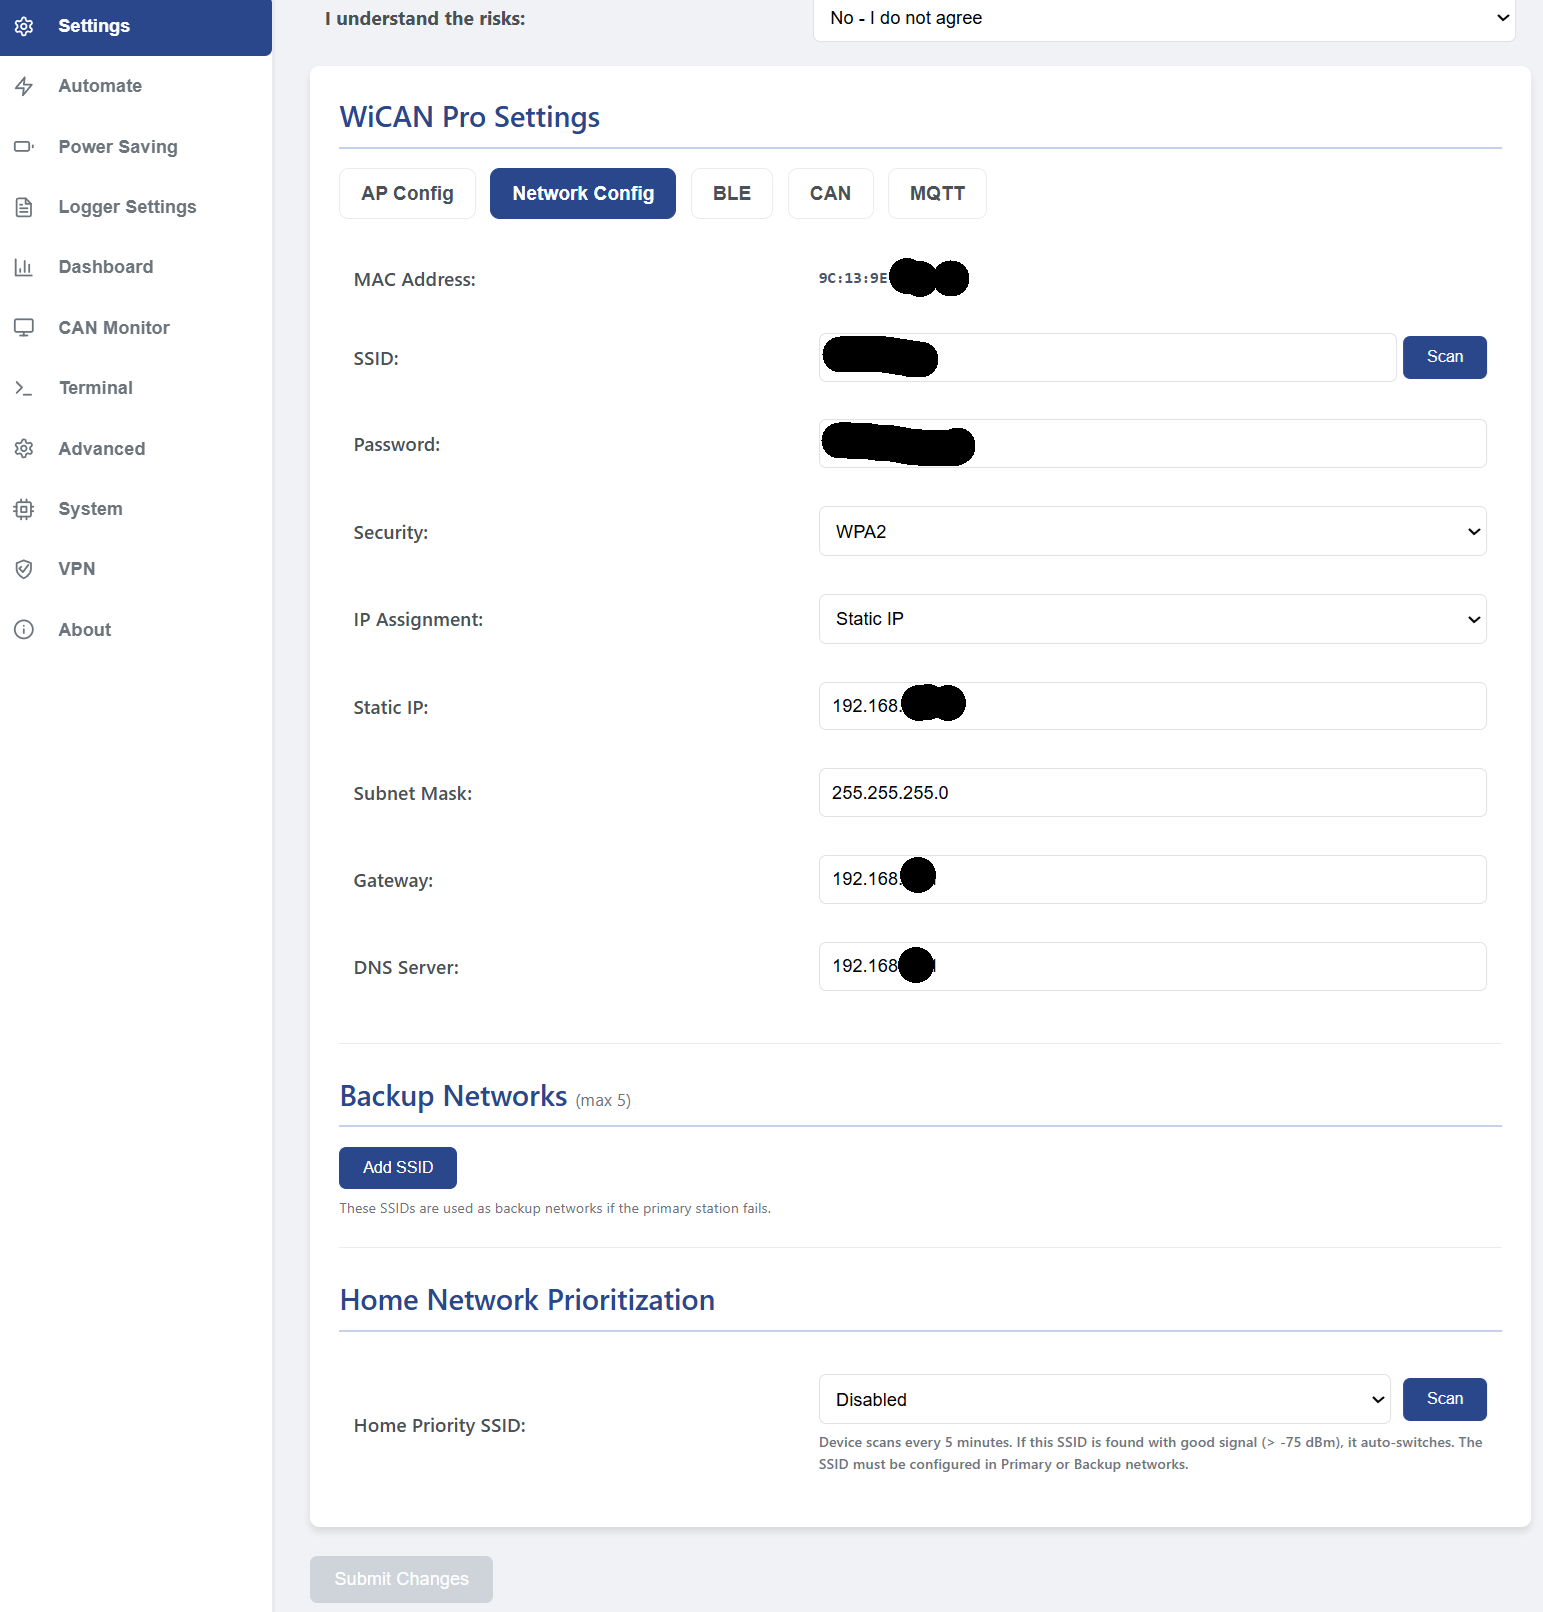
Setup Steps:
- Click the Scan button next to the SSID field to search for nearby networks.
- Select your home network (SSID) from the generated dropdown list.
- Enter your Wi-Fi Password.
- Choose your IP Assignment method:
- DHCP (Default): Your router automatically assigns an IP address. (Note: You can use the MAC Address listed at the top of this tab to set a DHCP reservation in your home router).
- Static IP: Manually define the IP Address, Subnet Mask, Gateway, and DNS Server in the specific fields that appear.
Additional Settings:
- Backup Networks: You can define up to 5 fallback SSIDs. If the primary network goes down or out of range, the WiCAN will attempt to connect to these in order. The Backup Networks can be any combinations of static and DHCP networks.
- Home Network Prioritization: Allows the WiCAN to aggressively scan for your primary "Home" SSID every 5 minutes and automatically switch back to it if the signal strength is good (better than -75 dBm).
3. BLE (Bluetooth Low Energy)
Configure the Bluetooth settings for connecting to smartphone apps (like Car Scanner or RealDash) without using Wi-Fi.
- Passkey: A 6-digit PIN required to pair your phone to the WiCAN. The first digit cannot be 0, and you must change the default
123456. - BLE Status: Enable or Disable the Bluetooth radio. (Note: Enabling BLE disables the Wi-Fi Access Point to save power and prevent conflicts).
- BLE Power: Adjust the transmission strength of the Bluetooth radio (from -12 dBm up to 9 dBm). Lowering this saves power, but reduces range.
4. CAN (Controller Area Network)
This tab configures the low-level physical connection to your vehicle's OBD2 port.
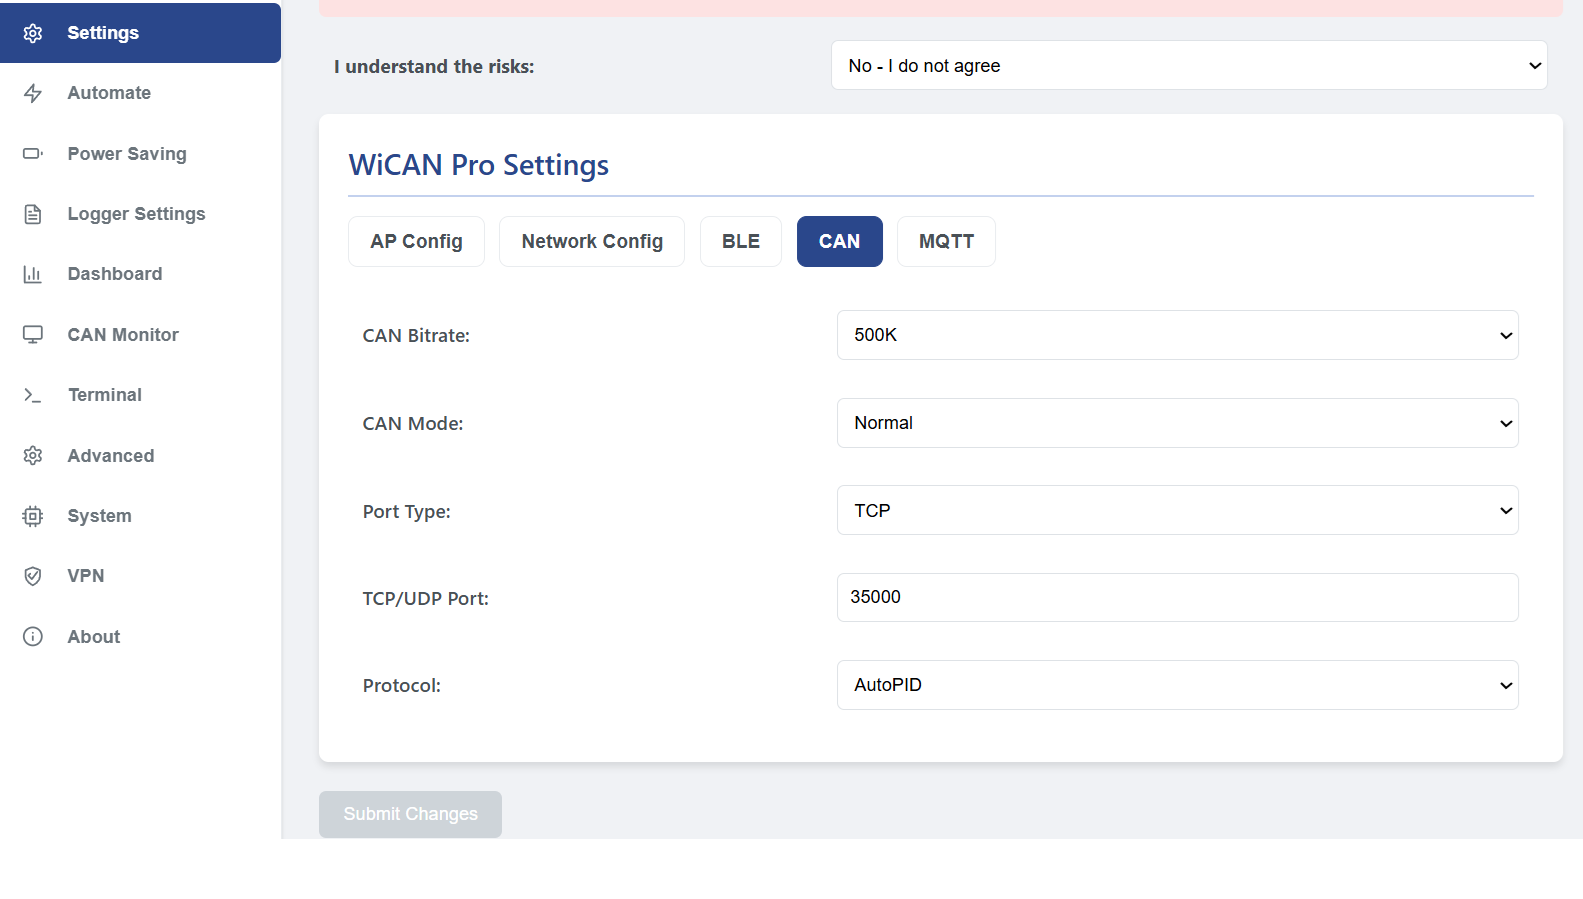
- CAN Bitrate: The communication speed. Almost all modern vehicles (2008+) use 500K. Older vehicles may use 250K.
- CAN Mode: * Normal: The WiCAN can send requests and receive data.
- Silent: The WiCAN only listens to the bus. It cannot send requests, making it completely invisible to the car (useful for raw CAN sniffing).
- Port Type & TCP/UDP Port: The networking protocol and port (default
3333) used by external apps to stream live data. - Protocol: Defines how the WiCAN translates data for external apps.
- AutoPID: The native protocol for the WiCAN Automate engine. Select this if you are using Vehicle Profiles or sending data to MQTT/Webhooks. If you have defined PIDs in the Automate page, if you must set this to AutoPID. Otherwise the automate functionality is disabled.
- elm327: Emulates a standard Bluetooth OBD2 dongle for legacy smartphone apps.
- savvycan: Optimizes the data stream for the SavvyCAN reverse-engineering software.
5. MQTT (Messaging Protocol)
Configure the connection to your MQTT Broker (like Mosquitto in Home Assistant).
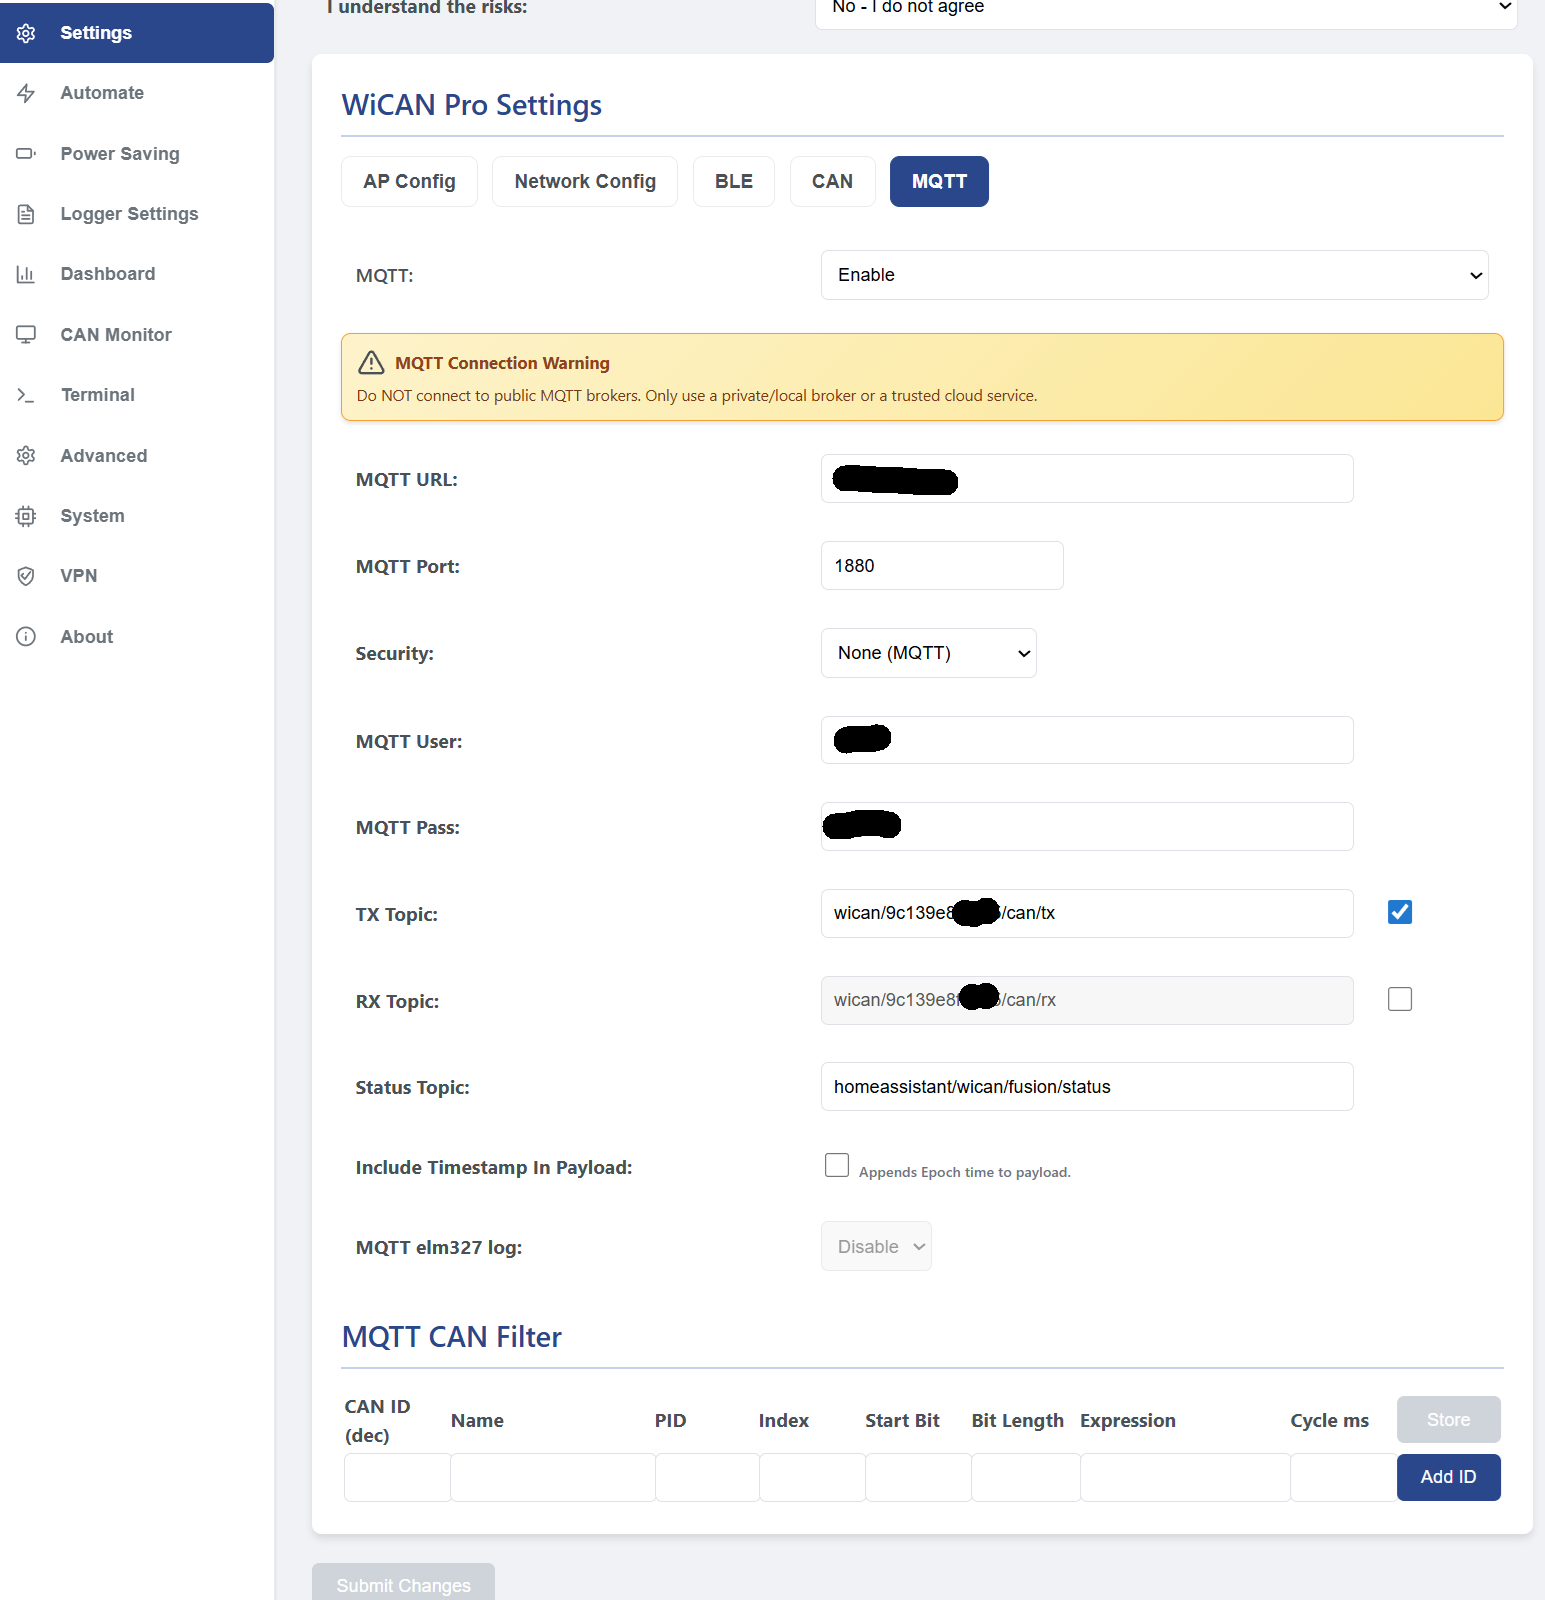
- MQTT: Enable or Disable the MQTT client. (Warning: Never connect to a public, unencrypted broker with vehicle data).
- MQTT URL & Port: The IP address/hostname and port (usually 1883 for TCP, or 8883 for TLS) of your broker.
- Security: Choose "None" for local networks, or "TLS" if connecting to a cloud broker. TLS requires you to upload a Certificate Set in the System tab.
- MQTT User / Pass: The credentials required to log into your broker.
- TX / RX / Status Topics: Define the base topics where the WiCAN will publish its data (TX), listen for commands (RX), and post its online/offline LWT status (Status).
- Include Timestamp: Appends a Unix Epoch timestamp to the JSON payload, ensuring Home Assistant knows exactly when the data was recorded, even if there was a network delay.
- MQTT CAN Filter: An advanced table that allows you to capture specific raw CAN frames (by ID and bit length) and instantly forward their raw hex data directly to your MQTT broker without processing it through the Automate engine.